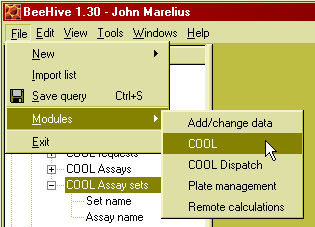
Figure n: Use the Modules sub-menu to load COOL the first time you want to use it.
by John Marelius
Last updated 2002-06-12, covers the COOL module in BeeHive version 1.33.
Registering an assay request without requesting a new sample
COOL is a system to manage the logistics of sending compound samples for chemical and biological assays. It provides interfaces for creating orders of compound samples for assays, for organising the samples on plates and for processing the requests and marking them as completed. These are forms (windows) in BeeHive where the user fills out fields. In addition, the database of requests can be searched using the standard BeeHive queries.
The typical work flow will be that
Someone requests an assay (or a set of assays) using one or more compounds.
The compound collection unit prepares the requested samples and send them to the persons in charge of the assays.
The persons who runs the assays process the samples and confirm that the request has been completed.
Note that Cool does not affect how assay result data is being handled.
Each project will be able to define sets of assays that will be performed e.g. for all new compounds. Such sets can be requested in a single operation.
This second generation COOL system is different from the first version in the following respects:
It is integrated in BeeHive, instead of being a stand-alone application.
Samples will be delivered in numbered, barcoded containers (plates and vials).
It uses the new plate database to keep track of plates (and vials).
Information on plates delivered through COOL is automatically imported into ActivityBase.
Plate information is also accessible through BeeHive using standard BeeHive queries.
E-mail notifications are sent to recipients of samples, both when an order is placed and when the samples are dispatched.
Still, the user inteface for placing orders and marking requests as completed are nearly unchanged.
COOL is a module in BeeHive, a component that can be enabled (loaded) or disabled (unloaded) by you as a user. Before you can use the COOL module, you must load it.
You only need to do this once, the next time you start BeeHive, the
COOL module will be loaded at start-up.

Figure n: Use the Modules sub-menu to load COOL the first time you want to
use it.
To request samples of compounds to be sent for a particular assay, you need to provide the following information:
The COOL request window is organised into these four sections, numbered as above, to make it easy to fill out all the necessary information. It is best to complete the sections in order, because some operations will not be enabled until you have completed the previous sections. You will see this as grey, disabled buttons.
An order in COOL contains all the requests for individual compounds made on one occasion by one user for one project. A new order is created when you press the 'Submit' button in the COOL Order window.
The following list gives the details on how to prepare an order.
0. Select 'Order' from the 'COOL' menu.
If you don't see the COOL menu, you need to
load the COOL module as described above.
- To add a new row as you type, press the down key.
- To change a compound ID or batch number, double-click that cell.
- To insert a new row after the current row, click the 'Insert' button.
- To delete the current row, click the 'Delete' button.
- To clear the compound list, click the 'Clear' button.
- Note that you can only edit the two leftmost columns 'Compound ID' and 'Batch'.
- Click the check-box 'Info' to display a pop-up window with the structure of the compound on the current row, and earlier requests of that compound.
Figure n: Selecting a batch in the compound selection panel of the order window.

Figure n: The order window with an order ready to be submitted. Note that
different assays may be requested in the same order.
If samples of the compounds to be assayed are already available to the
recipient - that might be yourself - you may still want to register assay
requests so that the logistics functionality of the system is maintained, i. e.
so that you and other users can see that the compounds have been submitted for
the assay. To register such a request that does not need to be dispacthed by
Compound Collection, construct the request as usual. Then set the 'Amount'
column to zero, to indicate that no new sample is required.

Figure n: Set 'Amount' to zero to register a request without requesting a new
sample.
As the designated recipient of samples for a particular assay, you will recieve samples in numbered containers. The samples may be delivered on plates of in vials - discuss your preferences with Compound Collection. Samples delivered on a plate may correspond to a single order, or may contain samples from more than one order.
To see the list of assay request for your particular assay

By default, the form shows only requests that have not been completed or cancelled. To show all requests, including completed or cancelled ones, check the box 'Show completed requests'. The box is disabled when there are unsabed changes.