 in the right upper corner of any iNet form to submit a question/suggestion
or a bug report online to Molsoft LLC.
in the right upper corner of any iNet form to submit a question/suggestion
or a bug report online to Molsoft LLC.
The iNet Admin Tools application is meant for managing iNet user's accounts and access rights. It is accessible for iNet Administrators only. What else???
The iNet Admin Tools application is installed with the iNet core package (iNet Documents, FromPage and Admin Tools).
To upgrade the iNet Admin Tools application you need to upgrade the iNet core package (iNet Documents, FromPage and Admin Tools).
If you have any problems or suggestions on using iNet Admin Tools,
please email us to inet@molsoft.com.
You can also click the Molsoft Company Logo
in the right upper corner of any iNet form to submit a question/suggestion
or a bug report online to Molsoft LLC.
iNet Admin Tools is an administrative application. It allows one to register users of iNet system and to define user groups that are convenient for granting access rights on other iNet applications.
An iNet user's account (or "user" for short) is a database record with the following fields:
User's login name is a string of lower case letters and digits, no spaces are allowed. User's password is just any string, at least 5 characters length, it is stored in the iNet database in the encrypted form. User's status can possess onne of the values "Active", "Inactive", "Deleted". There are two fields specifying start date and end date for the account to be enabled. Only users having active accounts that have not expired can login the iNet system.
For the sake of convenience you can allow some users to login without password. In this case, the user is authorized by the IP address of the machine he logs in from. For this purpose, each iNet user account can be accompanied with the list of IP addresses where he logs in from. Of course this is only reasonable if the user is the only one using the machines. For each user, his login history is stored in the database.
Initially, only two user accounts exist in the system, namely, "guest" and "root". User "guest" has no password, and can be used by anyone for accessing the iNet system. Neither "root" initially has a password, but he is asked for a password on his first login.
An iNet group is a named subset of iNet users. Any user can be in several groups as well as each group can contain many users. A group can be defined as a subgroup of another group: this means, that any member of the subgroup is automatically considered as a member of the parent group. A group can also have administrators, that is privileged users having additional rights on this group in different iNet Applications: iNet Contacts, iNet Photos etc.
A group info is also stored in the database as a record with the following fields:
By default, groups named "Inet", "Admins" and "IT" exist in the system.
The "Admins" group is a specific group, since members of this group have the following privileges:
The group called "Inet" is another specific group: it is implicitly considered as a parent group for all the other iNet groups. Only so-called "self-registered" users are not members of the Inet group. In most iNet applications, all users of iNet group have access rights.
Only members of Admins group can enter the iNet Admin Tools application and create / edit iNet users and groups. All the users created by iNet Admins are considered as official users of iNet and included in the group "Inet".
On the other hand, the iNet system can enable self-registration. This means that anyone in the world can go to the iNet location and register himself as an iNet user. A self-registered user is not a member of any group unless an iNet admin (member of Admins group) include him in a group. See section 5.3 "Configuring iNet Admin Tools" for the instructions on how to enable / disable self-registration.
If the user guest's account is active, anyone can log in the iNet system without self-registration. Each iNet application has his own access settings that specify guest's rights on the application.
The iNet Admin tools main form (figure 1) has three tabs, namely "Users", "Groups" and "IPs". The first and the second tabs serve for managing iNet users and groups respectively (sections '5.1 and '5.2). The "IPs" tab (figure 1) present the list of all IPs where password-free authorization is allowed from (see section 4.1 "Users" for details). This is done just to facilitate overview of all such IPs.
Figure 1. The iNet Admin Tools application: IPs view.
In the iNet Admin Tools Users view (figure 2) the list of all registered users is
presented. For each iNet user, values of the following fields are shown:
Login, Full name, Work phone, Division, Position, Location. Items in the
list can be shown in short, brief or full view, paged (5, 10, 20 etc. items
per page) and sorted by different fields. The green / red
ball icon  /
/  shows if
the user account is active or not. If the account is deleted the icon looks as
shows if
the user account is active or not. If the account is deleted the icon looks as
 . You can click the envelope icon
  near the account name to send an email to the user.
 Figure 2. The iNet Admin Tools application: Users view.
To create a new user's account click the "New user" button in the banner.
In the New User form (figure 3) you are to fill in at least "Login name",
"First name" and "Last name" fields. Click "Save" or "Apply" button in
the banner to save the created user.
To edit a user click edit icon
Use the "Status" dropdown list to change account's status (for example, to
activate the account). Choose "Member of Inet Group" in the next dropdown
list to convert a self-registered user into an official iNet user (member of
Inet group).
To open the View User form (figure 5) click user's login name in the list.
The form presents values of all the fields of the current user's account
and user's photos (see section 5.1.1 "Creating / editing users" for
instructions on how to attached a photo to a user's account).
The iNet Admin tools searches for the string you type in the edit on the
top of the Users form (figure 2) in the ??? fields of user accounts. The
string may contain the pattern symbol '*' meaning any seqyence of
characters. To start search, click "Search" button.
Once created, the iNet users accounts are stored in the iNet database
forever. You can only change their status to "Deleted". To do so, check
the necesary item in the list and click the "Delete" icon
5.1.1 Creating / editing users
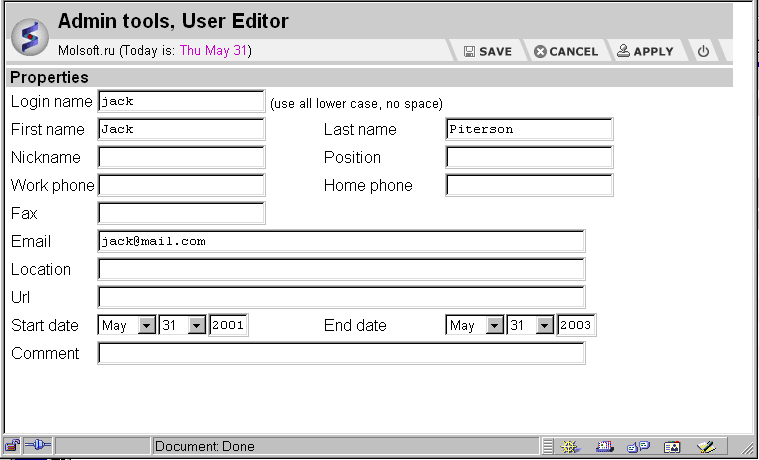 Figure 3. New User form.
 in the
corresponding line. The Edit User form (figure 4) contains all the fields
of the New User form. Additionally, it has the "Status" and "Member of
Inet Group" dropdown lists and the following sections:
in the
corresponding line. The Edit User form (figure 4) contains all the fields
of the New User form. Additionally, it has the "Status" and "Member of
Inet Group" dropdown lists and the following sections:
 in the list header.
 button to open a
multi-select form for groups. After you have typed or selected group
names, click "Add" button. To delete a group from the list, check it and
click the "Delete" icon in the list header.
in the list header.
button to open a
multi-select form for groups. After you have typed or selected group
names, click "Add" button. To delete a group from the list, check it and
click the "Delete" icon in the list header.
in the list header.
 Figure 4. Edit User form.
5.1.2 Viewing users
Figure 5. Viewing user.
5.1.3 Searching users
5.1.4 Deleting users
in the list header.
5.2 Managing groups
5.2.1 Creating / editing groups
5.3 Configuring iNet Admin Tools