Google Search: Keyword Search:
| Prev | ICM User's Guide 6.15 High Quality Publication Images | Next |
[ High Quality | Quick Image | Options ]
| Available in the following product(s): ICM-Browser | ICM-Browser-Pro | ICM-Pro |
6.15.1 High Quality Image |
To make high quality publication images:
The first step is to improve the quality of the image using the High Quality Image and Antialias buttons shown below.

To save and write an image:
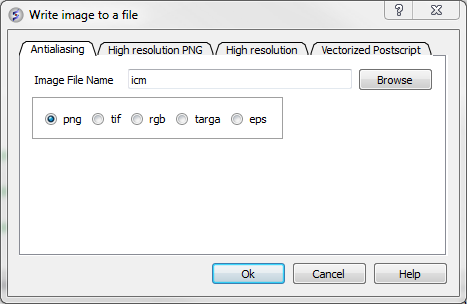
- Select File/Write Image and the following window will be displayed:

Choose one of the tabs depending on the image type you require:
- Antialiasing allows you to make png, tif, targa, eps or rgb file types.
- High Resolution PNG Allows you to specify a resolution increase and transparent backgroun.
- High Resolution Allows you to specify a resolution increase for tif, targa and rgb files.
- Vectorized Postscript This creates a vectorized postscript model of the screen image. Instead of the bitmap snapshot this command generates lines, solid triangles and text strings corresponding to the displayed objects. Since the postscript language is directly interpreted by high-end printers, the printed image may be even higher quality than the displayed image. The final resolution is limited only by the printer since the original image is not pixelized. Warning: there may be inevitable side-effects for some types of solid images at the intersection lines of solid surfaces (i.e. large scale cpk representation, hint: use display skin instead).
| **NOTE: With some graphics drivers the high resolution image may be distorted or multiple representations of the image in one frame. Please see the FAQs for a solution to this. |
6.15.2 Quick Image |
A quick image can be saved using this option. The image will be saved as icm1.png in the current directory in which you are working. Each subsequent image produced will be incrementally numbered.
This option is also available via a button as shown below:

6.15.3 Image Options |
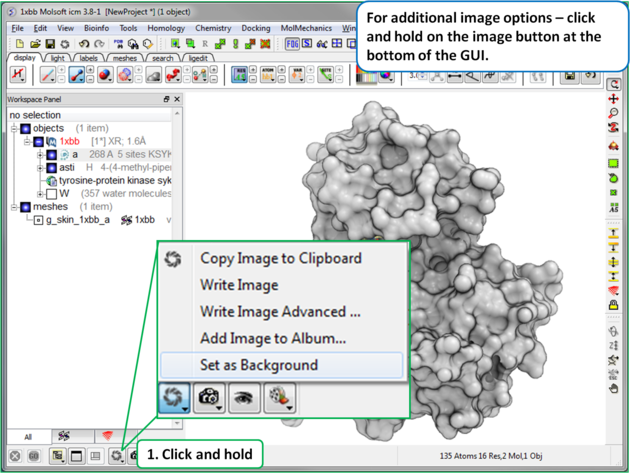
Click and hold on the image button at the bottom of the GUI to:
- Copy image to clipboard (single click on the button also does this).
- Resize image (Write Image Advanced)
- Transparent Background Write Image Advanced)
- Store an image in ICM (Write Image Advanced)
- If you are making an ICM document you may want to store images inside ICM (Add Image to Album).

| Prev Layers | Home Up | Next Molecule Represenations |