| Prev | 3.1 How to Use the Graphical Display | Next |
[ Load PDB | Move | Graphics Controls | Selections | Selection Levels | What is Selected | Workspace Panel | Display | Representation | Chain Breaks | Color | Pocket | Save Object | Saving an ICM Project File | DragnDrop | Right Click Options | Move Windows | Arrange Windows | Pictures ]
3.1.1 How to load a PDB Structure |
There are three main ways to read in a PDB file.
- Using the command line.
- Using File/Open button
- Using the PDB Search tab
Keyword search "PDB" for more information.

3.1.2 How to Move a Structure in the Graphical Display |
Ways to move structures using the mouse. Keyword search "mouse" for more information.
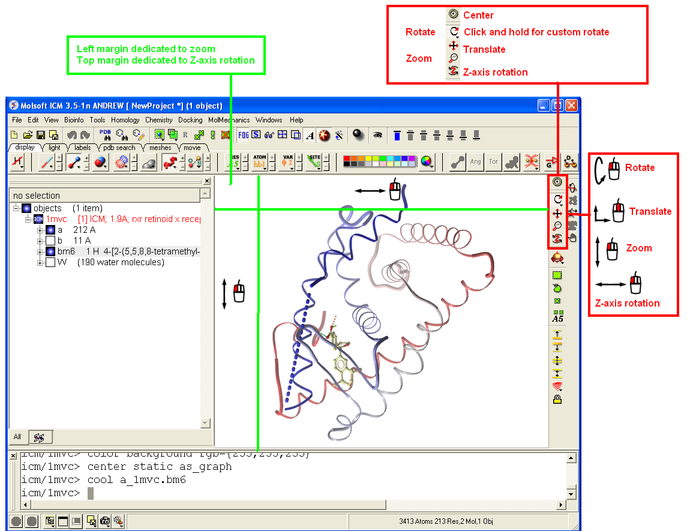
3.1.3 How to use the Graphics window controls |
In the graphics window you can use various tools described elsewhere. It is good to know the following:
- Picking a tool: the left mouse button will function according to the selected tool
- Popup menus: right click on an atom gives a pop-up menu
- Selecting in the rotation mode: the right mouse button will select atoms
- Translating in the rotation mode: the middle mouse button will translate the scene
- Zooming and moving clipping planes in the rotation mode: the left, top and right margins of the graphics window are reserved for other actions, zoom, z-rotation, and clipping plains, respectively. That means that even if you are picking atoms, by pressing control you can still rotate your molecule with the left-mouse-button.
- Rotating in any non-rotation mode: if you press Control in any mouse mode, e.g. zoom, pick etc., it will temporarily switch to rotation
- Escaping from the connect and continuous movement modes: pressing Escape helps to get out of certain modes, such as Full Screen, Continuous rotation or rocking, the Connect mode.
- Global rotation in the Connected mode: pressing Shift will temporarily switch to the global rotation/translation mode.
See also: Graphics controls.
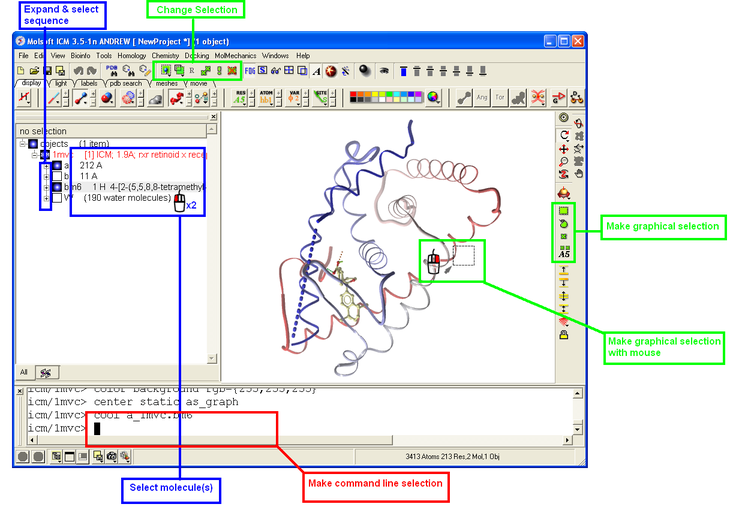
3.1.4 How to Make Selections |
Making selections in ICM is an important skill to master (e.g. you may want to select a binding pocket for docking or a region of a molecule for coloring). The four levels of selection are:
- Atoms
- Residues
- Molecules
- Objects (multiple molecules comprising a PDB entry)
There are several ways of making selection in ICM. The simplest is to interact directly with the graphics window - right-click, hold and drag around the area of the screen you want to select. Alternatively, in the workspace window, expand the tree of molecules and chains until the relevant protein sequences is displayed. Then left click and drag to mark residues to form a selection.
See the chapter entitled Making Selections for more information.
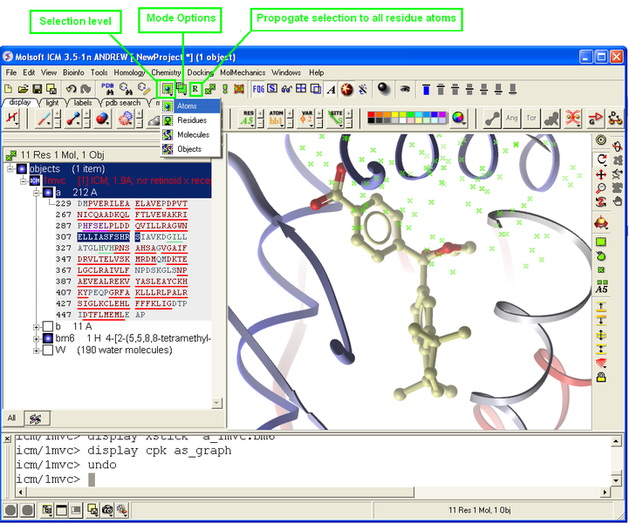
3.1.5 How to Change the Selection Level and Mode |
It is possible to change the level of selection before or during the building of a selection. The selection level drop-down menu can be used to do this.
For example, a C-alpha of a residue is selected but one would like to have the whole residue selected (i.e. all atoms). Change the level to Residues<. This selection can then be changed into all atoms of the residue by then selecting the Atoms level again.
It is also important to observe the selection mode that is being used. There are four modes:
- New: new selection replaces everything selected before
- Add: new selection is added to previous selection(s), if any
- Remove: previously selection (part or whole of it), if included in the new selection will be unselected.
- Toggle: within the new selection, everything that has been selected is unselected and everything that hasn�t been selected, will be selected
See the chapter entitled Making Selections for more information.
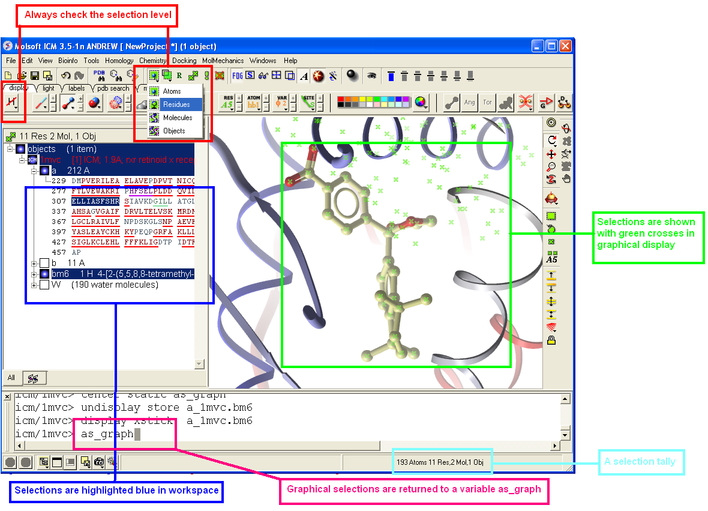
3.1.6 How to Check What is Selected |
Once you have made your selection - how can you be sure you have made it and what exactly have you selected. See the chapter entitled Making Selections for more information.
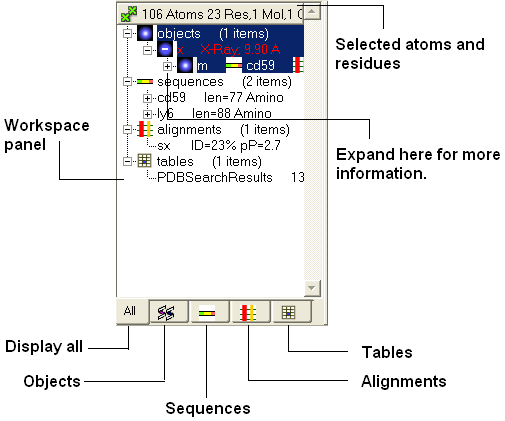
3.1.7 How to use the ICM Workspace Panel |
The workspace panel (located on the left hand side panel of the gui) is an important place within the graphical user interface because it displays which sequences, structures, objects, tables and alignments are currently loaded into ICM. Also, from this panel you can make graphical selections and drag and drop objects and sequences to other locations within the GUI. More details about how to use the ICM Workspace Panel for displaying structures can be found here.
3.1.8 How to Display a Molecule |
Once a structure has been loaded into ICM the individual components of that structure (i.e. amino acids, metal ions, binding sites etc) are listed in the ICM workspace.
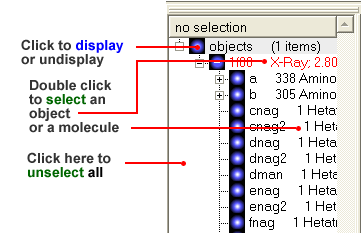
To display every component of the object except for binding sites and water atoms:
- Click on the white box next to the word object at the top of the ICM workspace. This box will be colored blue once the structure is displayed
To display the whole structure in wire, ribbon, cpk, skin, surface and xstick representations:
- Right click on the blue box next to the word object. A menu will be displayed.
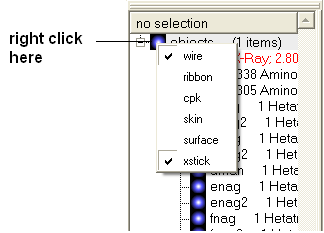
- Select which representation you desire for your structure by clicking on the appropriate word. A check mark indicates the representation currently displayed. To un-display a particular representation click on the word again.
In order to clear your graphical display:
- Select View/Undisplay All
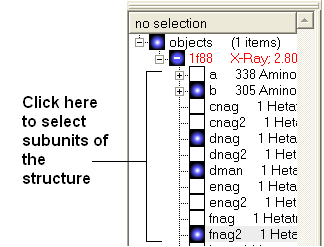
If you only wish to display part of the structure then click in the boxes further down the tree in the ICM workspace.
To display the selected regions of the structure in wire, ribbon, cpk, skin, surface and xstick representations:
- Right click on the appropriate box in the ICM workspace. A menu will be displayed.
- Select which representation you desire for your structure by clicking on the appropriate word. A check mark indicates the representation currently displayed. To un-display a particular representation click on the word again.
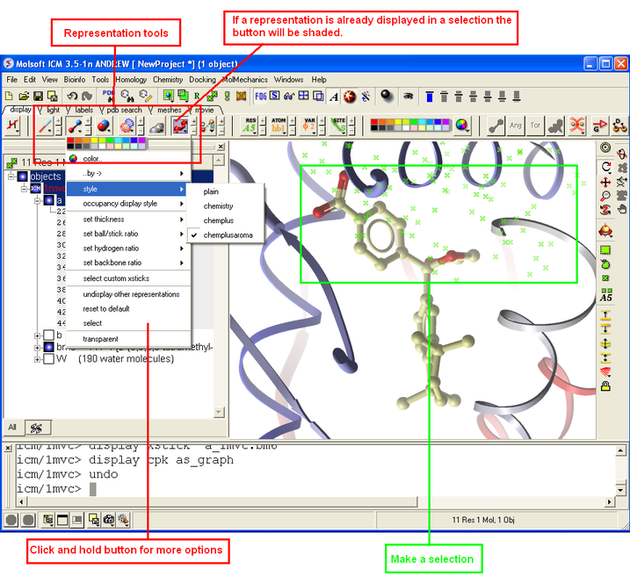
3.1.9 How to Change Protein Representation |
To change the representation of the protein, make a selection and then use the tools in the display tab.
There are 5 main types of representation:
- Wire: Wires connecting covalently bound atoms of a molecule. This representation has no defined thickness as such will not make shadows. Useful for showing the chemical structure of a small molecule.
- Xstick: Covalent bonds are represented as cylinders whilst atoms are represented as small spheres..
- CPK: Atoms are represented as spheres with their respective van der Waals radius and coloured according to a standard defined by Corey, Pauling and Kultun.
- Surface: Solvent accessible surface. This is the center of water sphere as a water probe rolls over the molecule.
- Skin: A Connolly molecular surface over the selection. This is a smooth envelope touching the van der Waals surface of atoms as a water probe rolls over the molecule.
- Ribbons: Cartoon representation of protein and DNA secondary structure. Protein residues marked as alpha-helices ('H') are shown as a flat, helical ribbon, those marked as beta-sheets ('E') are shown as a flat ribbon with an arrow-head, and the rest are shown as a cylindrical "worm". If secondary elements are not defined everything will be shown as a cylindrical worm. ICM can automatically assign secondary structure: Tools/3D predict /Assign Helices and Strands
3.1.10 How to remove chain breaks (dotted lines) |
Chain breaks in a protein structure are represented by dotted lines. To remove them use GRAPHICS.chainBreakStyle =1
eg
read pdb "1xbb"
cool a_
GRAPHICS.chainBreakStyle = 1  # this removes the dotted lines between chain breaks
In version 3.6-1a and above you can use the options in the display tab. Click and hold on the ribbon button. You can then select Display Chain Breaks/ None.
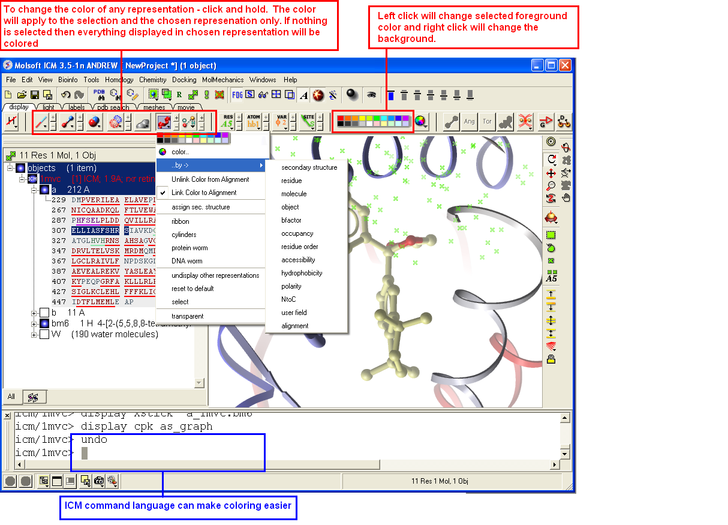
3.1.11 How to Color |
To change the color of the representation you need to use the buttons in the display tab.
Changing the colour of a representation works in much the same way as displaying the representation itself. The selection rationale is the same followed by clicking on a colour in the palette. It is also possible to colour different representations of the same selection independently (e.g. when displaying a loop (selection series of residues), represented as ribbon and xsticks; colour the ribbons of that selection in cyan and the xsticks in red).
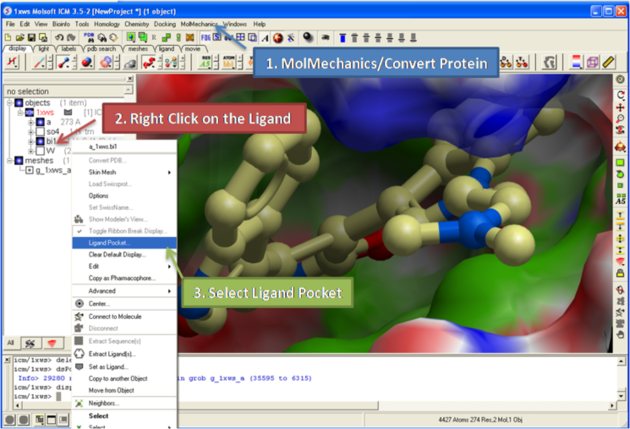
3.1.12 How to Display a Binding Pocket Surface |
To display the surface of a small molecule ligand or peptide binding pocket:
- Load the PDB of interest.
- Convert PDB to ICM object. If you do not convert you will not get the properties of the pocket displayed on the surface.
- Right click on the small molecule or peptide in the ICM Workspace and select Ligand Pocket.
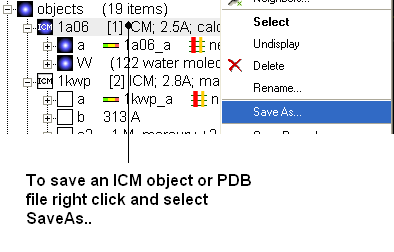
3.1.13 How to Save an ICM Object |
Any ICM object such as a structure, sequence, or alignment, can be saved for use at a later time.
To save an object:
- Right click on the object name in the ICM workspace or ICM alignment editor and a menu will be displayed.
- Click on the Save As... option.
- Enter the unique name you wish to call your object in the box labeled File name:
- Choose which folder or directory you wish to save your object by clicking scrolling down in the box labeled Save in:
- Choose which file type you would like to save your object as by scrolling down in the box labeled Save as type . ICM structure objects should have the file ending yourfilename.ob and alignments yourfilename.ali
- Once the appropriate information has been entered click on the Save button in the bottom right hand section of the window.
- The object is now saved.
3.1.14 How to Save an ICM Project File |
All objects contained within an ICM session can be saved in a single file with the extension .icb. The file can then be read into ICM and the exact layout of the file will be preserved. To save a project file go to the File menu and select Save Project.
3.1.15 How to Drag and Drop |
| NOTE: "Drag and Drop" is a useful way of moving objects and sequences around the graphical user interface. |
Sequences and objects can be moved around the graphical user interface by dragging and dropping them. All loaded sequences and objects are always displayed in the workspace panel. Select the desired object or sequence from the workspace panel by clicking and holding, move the selection to the desired location and release.
This is a useful application in the graphical user interface. For example, you may have an alignment displayed and you wish to add another sequence to the alignment. This can simply be accomplished by dragging a loaded sequence from the workspace panel into the alignment display panel. Or, you can quickly view an object by dragging and dropping it from the workspace panel into the 3D graphics window.
3.1.16 How to: Right Click Options |
| NOTE: If you right click on any object you will see a new menu of options related to that object. |
The right click mouse option can be used throughout the graphical user interface. It is a very useful means of opening up a whole new world of menus and options. Most of these options are described in this book. However, when using the graphical user interface it is always a good idea to try right clicking the mouse on an object and seeing which extra options that are available for you to use.
3.1.17 How to Move Windows |
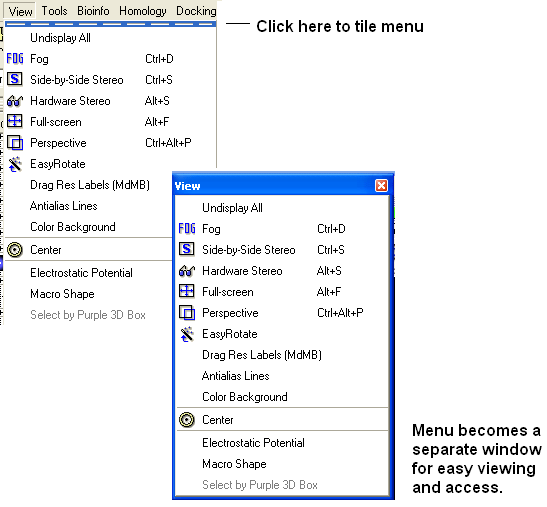
It is possible to move some windows around the graphical user interface to make viewing easier.
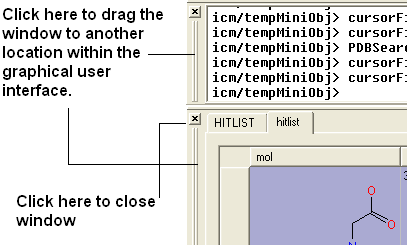
It is also possible to separate menus from the GUI.
| NOTE: To return to the default display option select the 'Default layout' option in the windows menu. |
OR
Click the default layout icon.
OR
Double click on the window header.
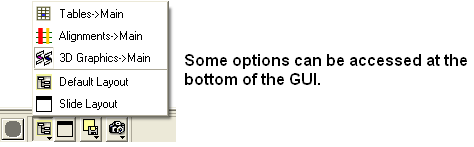
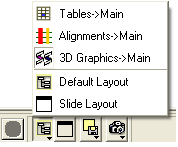
3.1.18 How to Arrange Windows |
Sometimes when using ICM you may have many items displayed such as structures, alignments and tables. As a default the graphical display is the largest and centered in the middle of the ICM graphical user interface. However if you wish to work on an alignment or table you can place the alignment or table as the main display by clicking on the buttons shown below. The larger display generally makes it easier to manipulate the alignment or table. There are ofcourse other ways to alter the layout such as tier the windows but this option is just a simple click and can sometimes come in useful.
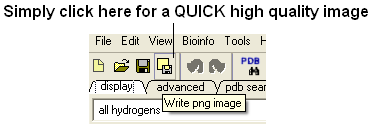
3.1.19 How to Make a Picture |
There are several ways of taking a picture of the contents of the 3D graphical display window see the write image section. However the easiest way is to simply click on the camera button in the view tools panel.
Or select /File/Quick Image
The picture will be automatically saved as a PNG file in the directory from which you loaded ICM. The default picture name is icm[n].png, where n is the number of pictures taken in one ICM session. To save in other picture formats and to change the file name see the write image section.
| Prev Getting Started | Home Up | Next Selections |