| Prev | ICM User's Guide 19.1 Standard ICM Tables | Next |
[ New Table | Read | Table save | Basics | Grid View | Save Table View | Search | Table Color | Table Font | Table Alignment | Mark a Row | Right click | rename | clone | delete | Page Setup | Print | Excel | Save | Column and Row Width | Selections | Edit | Insert/Columns | Statistics | Insert/Rows | Copy, Cut and Paste | Copy Cell | Copy to Table | Delete | Hide/Show | Change Column Format | Sort | Filter/Append | Mark and Select Rows | Table Mouse Actions ]
19.1.1 Generate New Table |
To generate a new empty table:
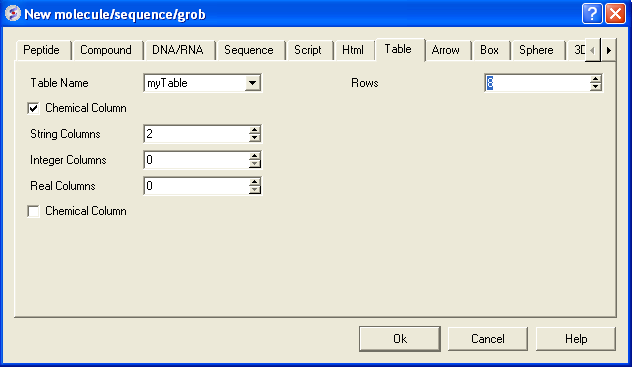
- File/New and select the Table tab and a window as shown below will be displayed.
- Enter the number of rows and columns you wish to include in your table and whether you wish to add a column with chemical data.
- If you wish to make a chemical table (chemical spreadsheet) select the Chemical Column box.
19.1.2 Reading a Table |
A table can be read and saved as a .csv file or a .tab file. Saving or reading your table as a csv (comma separated value) file enables the table to be transfered or loaded from other applications such as Microsoft Excel. A compound database such as an .sdf file can also be viewed as a table in ICM, additional details on how to manipulate a molecular table is explained in the next section.
A table can be read into ICM by selecting:
- File/Open and then selecting the table you have saved.
OR
Sometimes data is naturally stored and displayed in a table - e.g. PDB data. A common use of tables is for compound data. An explanation of how to use compound molecular tables is in the next section entitled ICM Molecular Tables.
For an example of a table try the following:
- Select PDB search tab.
- Type * into data entry box.
- Click on the button next to the data entry box.
A table of all the PDB structures will be displayed at the bottom of the GUI.
| NOTE: If you have loaded a table and it is not displayed it may be because the table window is hidden. To display the table, select the window menu and select table see the Window Menu Section . |
19.1.3 Saving a table |
To save the whole table:
- To save a table right click on the table header tab and select Save As..
To save a row selection:
- Select a row(s)
- Right click and choose Save Selection As or Save Selection As Csv + Headers
19.1.4 Basic Table Navigation |
To view the contents of a table you can move the table up and down using the scroll bars on the side and bottom of the display.
| NOTE: If you have loaded a table and it isnt displayed it may be because the table display isnt selected. To select the table display, select the window menu and select table (See Window Menu Section ). |
If you have read more than one table in ICM you can select a table by clicking the tab on the top of the table (See Below).

| NOTE: Double clicking on the tab allows two tables to be displayed at once. Double clicking again returns to the default table layout. |
| NOTE: Information regarding the number of rows and columns within a table is displayed at the bottom of the table. |
If you would like the table to be the main window in the graphical user interface:
- Select Windows/Table->Main
19.1.5 Table View (Grid Layout) |
To change the table view (layout):
- Select the columns you wish to display in grid view. No selection will place all columns in grid view
- Right click on a table row and select Table View
- You can view the table in Grid View and toggle between grid and standard view. You can define your own grid using the Custon Grid option or display the table in Form View.
| NOTE: You can save a table view. |
19.1.6 Table View Save |
Once you have a table view that you want to keep. You can save it by:
- Right click on a table row and select Store Views
- Select Save Current View
- Enter a name for the table view and you can return to that view by repeating the first two steps above.
- You can rename, delete or restore view by right clicking on the name of the table view.
19.1.7 Table Search |
To search a table:
- Right click on a table row and select Find and Replace. You can also use CTRL F.
- Enter a search string.
- Press the Find button.
19.1.8 Table Color |
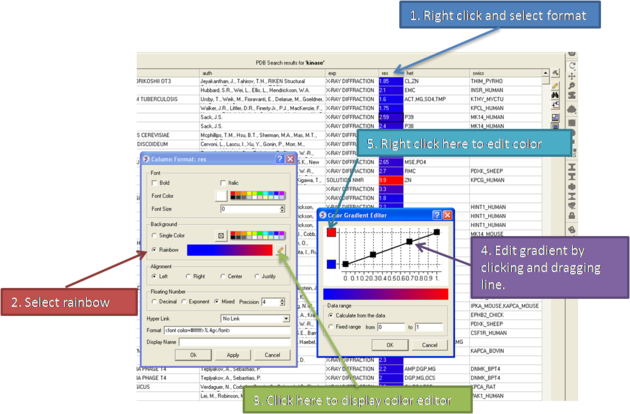
You can color your table based on values within a column by:
- Right click on the column header and select Format.
- In the Background panel select the color you desire eg Single Color or you can by a rainbow according to the data in the column. To edit the range of values relating to each color click on the pencil (edit) button as shown below.
19.1.9 Table Font |
- Right click on the column header and select Format.
- Change the font using the options in the Font panel.
19.1.10 Table Alignment |
- Right click on the column header and select Format.
- Change the font using the options in the Alignment panel.
Rows can be colored by marking them as described here
19.1.11 Mark a Row |
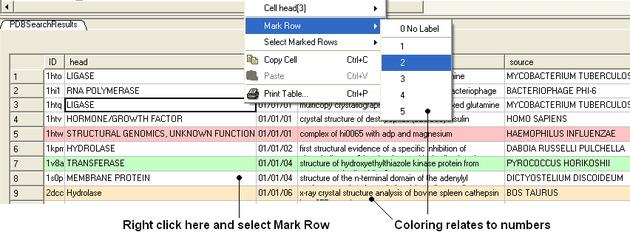
A row in a table can be marked and grouped by a label which enables the row(s) to be selected easily at a later time.
To mark a row
- Right click on the row in the table you wish to mark. Or select multiple rows and then right click.
- Select Mark Row/ and then choose a number. In the GUI the number of rows that can be marked is limited to 5 but this can be increased using the command line command.
- A row that is marked will be colored - each number is assigned a color. The coloring can be changed in the gui tab in preferences.
To select marked rows
- Right click on the table and choose Select Marked Rows and choose a number which relates to the marked rows as described earlier.
- Selected rows will be highlighted blue - once rows are selected a number of right click options are activated such as copy selection to new ICM table.
19.1.12 Table right click options |
Right-click options vary according to where you click and what is selected. The options are intuitive, for example options that are performed on the whole table (eg Save and Delete) are performed by right-clicking on the Table tab. Other right-click options vary according to whether the row or column is selected or not.
19.1.13 Rename a Table |
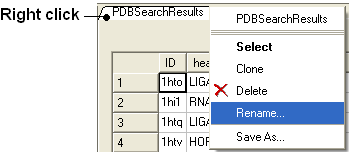
To rename a table:
- Right click on the table tab and select rename.
- Enter a new name and select OK.
19.1.14 Clone a Table |
- Right click on the table tab and select clone.
19.1.15 Delete a Table |
- Right click on the table tab and select delete.
19.1.16 Page Setup |
Before printing a table you can change the orientation and scale.
To do this:
- Right click on the table header and select Page Setup.
19.1.17 Print a Table |
A table can be printed by:
- Right click on the table and a menu will be displayed.
- Select the "Print" option. You may want to change the setup of the table (eg orientation and scale. You can do this using Page Setup option.
19.1.18 Export to Excel |
To export a table to excel.
- Right click on the table header.
- Select the option to Export to Excel.
19.1.19 Save a Table |
- Right click on the table tab and select Save As..
| NOTE: You can save your table in comma separated format if you want to read it into another program such as Microsoft Excel. |
19.1.20 Change Column and Row Width |
To change the width of column and rows:
You can change the width of a row or column by clicking on the separating line and dragging. You can make each row the same width by holding down the Shift key and dragging one of the row edges.
19.1.21 Making Table Selections |
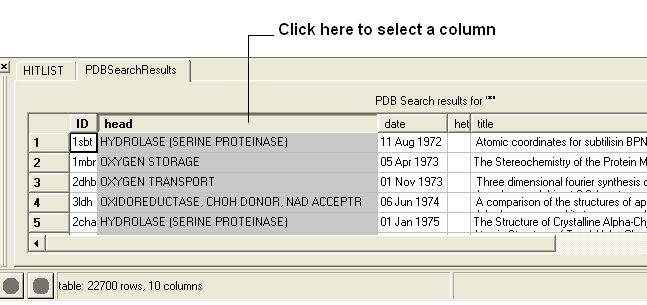
To select one column of a table:
- Click on the column header
To select one row of a table:
- Click on the row header

To select more than one row or column:
- Click on one row or column whilst pressing the Ctrl key
- Select multiple number of rows or columns whilst still pressing the Ctrl key
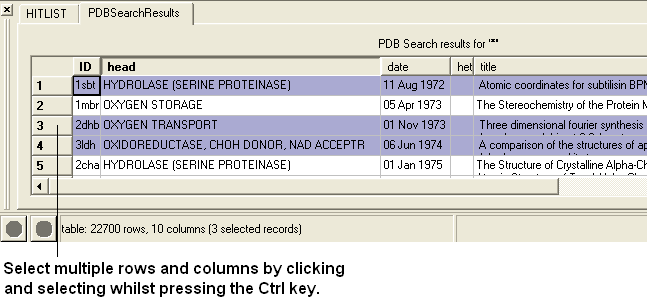
| NOTE: The Ctrl key acts as a toggle enabling select and unselect. |
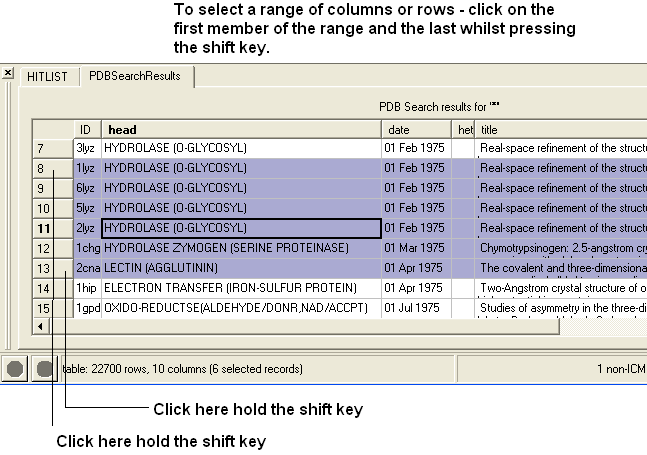
To select a range of columns or rows:
- Click on the first row or column in the range whilst pressing the Shift key.
- Click on the last row or column in the range whilst pressing the Shift key.
To invert a selection:
- Right click on the original selection and a menu will be displayed.
- Select the Row Selection/Invert selection option.
| NOTE: Invert selection can only be used on rows. |
To select the whole table:
- Right click in the table and a menu will be displayed.
- Select the Row Selection/Select All option.
To remove a selection:
- Click anywhere within the table.
A selection can also be made from a plot select(`table-plot{See Select plot section}).
19.1.22 Editing a Table |
To edit the contents of a table column:
- Select the column and then right-click on a column header and a menu will be displayed.
- Select the "Edit Mode" option. A tick will be displayed if it is selected.
OR
To edit the text or values within a cell:
- Right click on the table and select Edit Cells by Double-click .
To edit the name of a column:
- Right click on the column header and a menu will be displayed.
- Select the option "Rename Column..." and enter the appropriate new text.
19.1.23 Inserting Columns |
To insert a column:
- Identify the position within the table where you wish the column to be inserted.
- Right click on the column header and a menu will be displayed.
- Select "Insert Column"
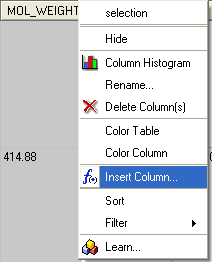
A dialog box will then be displayed as shown below.
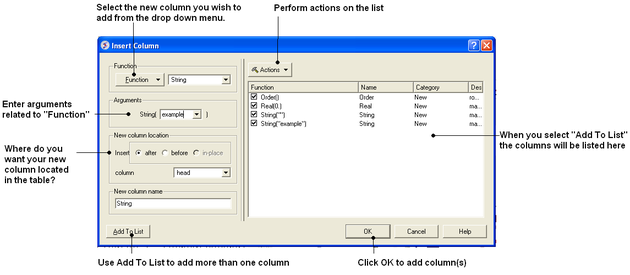
- Select the function you wish to add to the new column. Functions can be applied to many columns e.g. add etc..
- A set of arguments related to the function selected will then be displayed.
- Enter the appropriate arguments related to the function selected.
- Select where you want the new column to be located in the table.
- Enter the new column name
- If you wish to add multiple columns then use the Add to List option.
Many different functions are available:
- New Add a new column containing a real number, integer, string,or random number.
- Transformations A number of transformations can be selected and applied to a table column as shown below.
- Mathematical A number of mathematical functions
- Text Apply a number of different functions to the text in a column.
- Chemical Calculate a number of different chemical properties.
- Convert Units Radian to Degrees and Degree to Radian
Once the function and the correct arguments have been entered:
- Select whether you wish the new column to be added before,after or in place of this column.
- Enter the name of the new column.
| NOTE: If you want to add more than one column choose Add to List and the action will be added to a list on the right hand side of the dialog box. |
19.1.24 Column Statistics |
To calculate various statistics describing columns and inter-column relationship:
- Right click on the column header and a menu will be displayed.
- Select "Column Statistics"
The output is printed into the ICM Terminal window and the Column Statistics Window.
19.1.25 Inserting Rows |
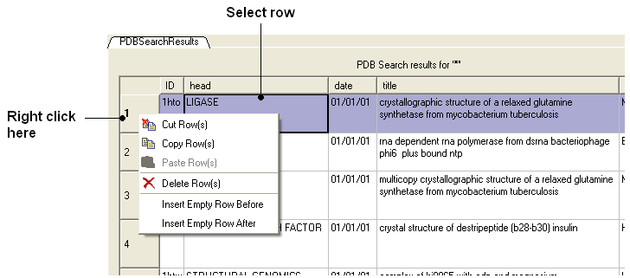
To insert a row:
- Identify the position within the table where you wish the row to be inserted and select the row.
- Right click on the row name (eg the number of the row) and a menu will be displayed.
- Select Insert Row Before or Insert Row After.
A blank row will be inserted. You can add data to this row by following the instructions in the edit table section.
19.1.26 Copy Cut and Paste Row |
Copy, Cut and Paste Row:
- Select the row(s) See table selection section.
- Right click on the row header
- Select Copy Row(s).
- To paste a row select the row header under which you wish to paste the row. Right click and select Paste Row(s)
19.1.27 Copy Cell |
To copy a table cell:
- Right click on cell.
- Select Copy Cell - you can then paste it into a new table.
19.1.28 Copy Selection to an ICM Table |
To copy a selection to a new table:
- Select the row(s) See table selection section.
- Right click on the row header
- Select Copy Selection to ICM Table and then choose Auto (ICM will name the table or New and you can enter a new table name.
19.1.29 Deleting Columns and Rows |
To delete a column or row:
- Select the column(s) or row(s) you wish to delete. See the select table section for information on how to make table selections.
- Right click on the row to delete a row or right click on the column header to delete a column and select the delete option from the menu.
19.1.30 Hide and Show Columns |
If you have a large table you may wish to only show and display certain columns and hide others. By default any loaded table will have all the columns displayed.
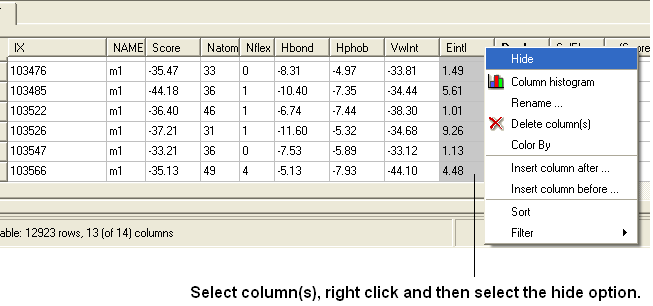
To select which columns you wish to hide:
- Select the column(s) you wish to hide. See the select table section for information on how to make table selections.
- Right click and select the hide option from the menu.
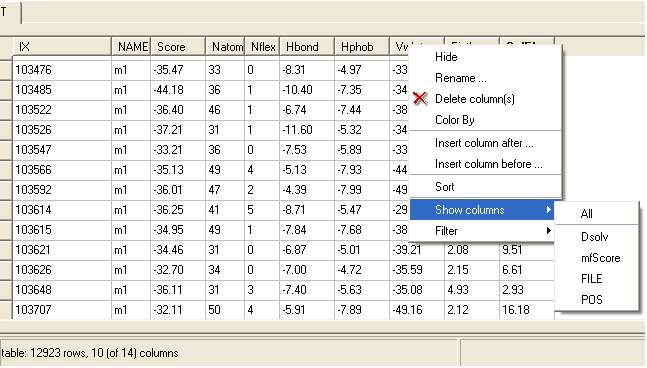
To show hidden columns:
- Right click on the column header and a menu will be displayed.
- Select the Show Columns options.
- Select which column you wish to show from the drop down list.
19.1.31 Change Column Format |
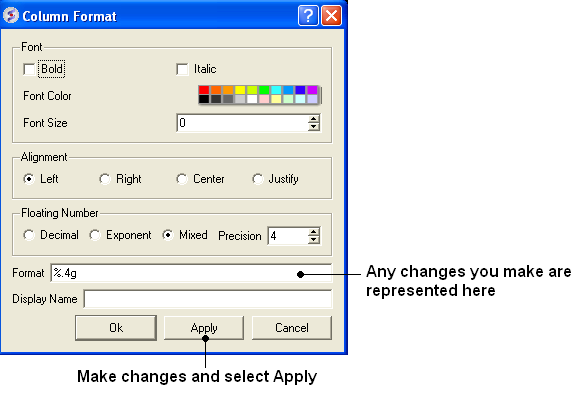
To change the font color or size, the alignment of the column data, the floating point number or column name.
- Right click on the column header and select Format
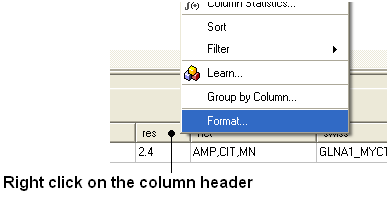
- A window as shown below will be displayed.
- Make the desired changes and click Apply
19.1.32 Table Sorting |
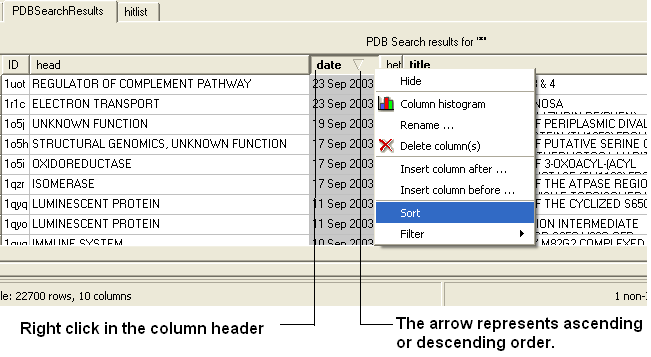
To sort a table by a column value:
- Right click on the column header.
- Select the Sort option.
19.1.33 Table Filtering and Appending |
Here we will describe how you can filter your table so that you can then append the filtered data to a new table or display only relevant information to your filter query.
To filter a table:
- Select the column you wish to filter. See the select table section for information on how to make table selections.
- Right click on the column header.
- Select the Filter option.
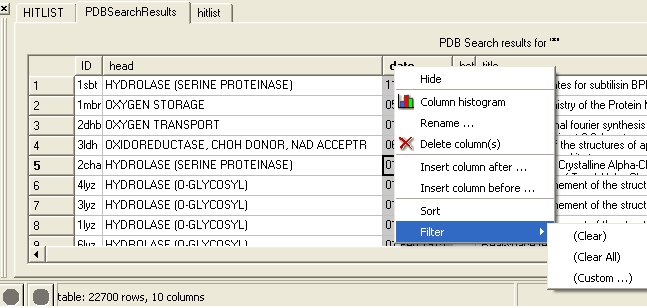
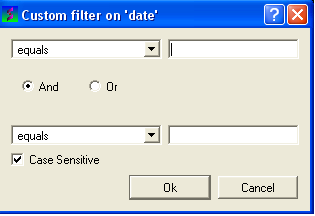
- Select the "Custom" option and a data entry box as shown below will be displayed.
- Enter the appropriate operations and filter values for your search.
- Click OK.
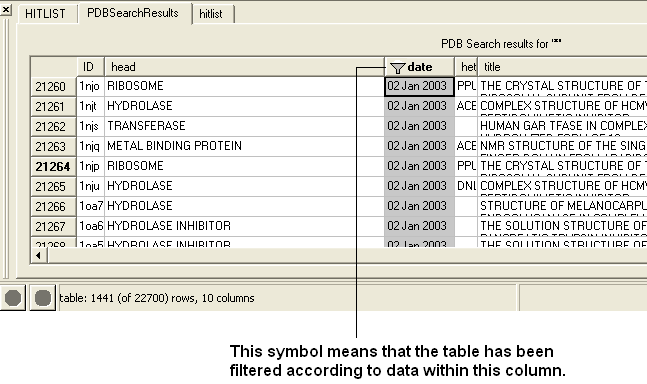
| NOTE: When a column has been filtered a symbol as shown below will appear in the header of the column. |
To append the filtered information into a new table:
- Select the whole table either by right clicking or pressing Ctrl A.
- Right click on the table and select "Append to other table".
- Enter a new name for the table you are appending with your filter results.
OR
Selected rows can be appended to a new table by:
- Right clicking on the selected rows and a menu will be displayed.
- Selecting the "copy selection to ICM table" option.
A table can be filtered by a cell value:
- By clicking once in a cell.
- Right click and a menu will be displayed.
- Select the option "Filter by cell value".
A filter can be cleared by:
- Right clicking on the column selection and selecting Filter/Clear or Filter/Clear All
19.1.34 Mark and Select Rows |
A row in a table can be marked and grouped by a label which enables the row(s) to be selected easily at a later time.
To mark a row
- Right click on the row in the table you wish to mark.
- Select Mark Row/ and then choose a number. In the GUI the number of rows that can be marked is limited to 5 but this can be increased using the command line command.
- A row that is marked will be colored - each number is assigned a color. The coloring can be changed in the gui tab in preferences.
To select marked rows
- Right click on the table and choose Select Marked Rows and choose a number which relates to the marked rows as described earlier.
- Selected rows will be highlighted blue - once rows are selected a number of right click options are activated such as copy selection to new ICM table.
19.1.35 Mouse and Cursor Actions on a Table |
The actions resulting from a mouse click or cursor on a table can be changed by:
- Right click on a table and select Table View/Show Extra Panel
- A panel as shown below will be displayed.
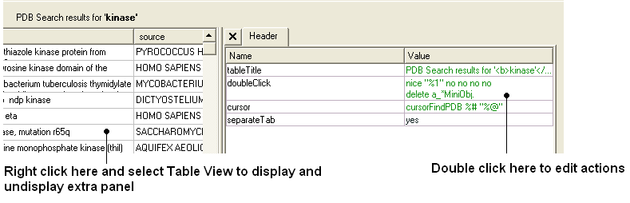
- Double click in the Value column and the column can be edited. Add ICM commands for the action you want. A value in a column can be referred to using "%" e.g. column two would be referred to as "%2". In the example shown above the function nice is acting on the contents of column one for the double click action.
| NOTE: The action associated with cursor and double click is placed in a variable name TableName.cursor and TableName.doubleClick |
| Prev Tables | Home Up | Next Molecular Tables |